
Tutorial
Step 9: Implementing dialogs
| This step teaches you how to implement dialogs. You will also learn how to reuse an existing PMO. |
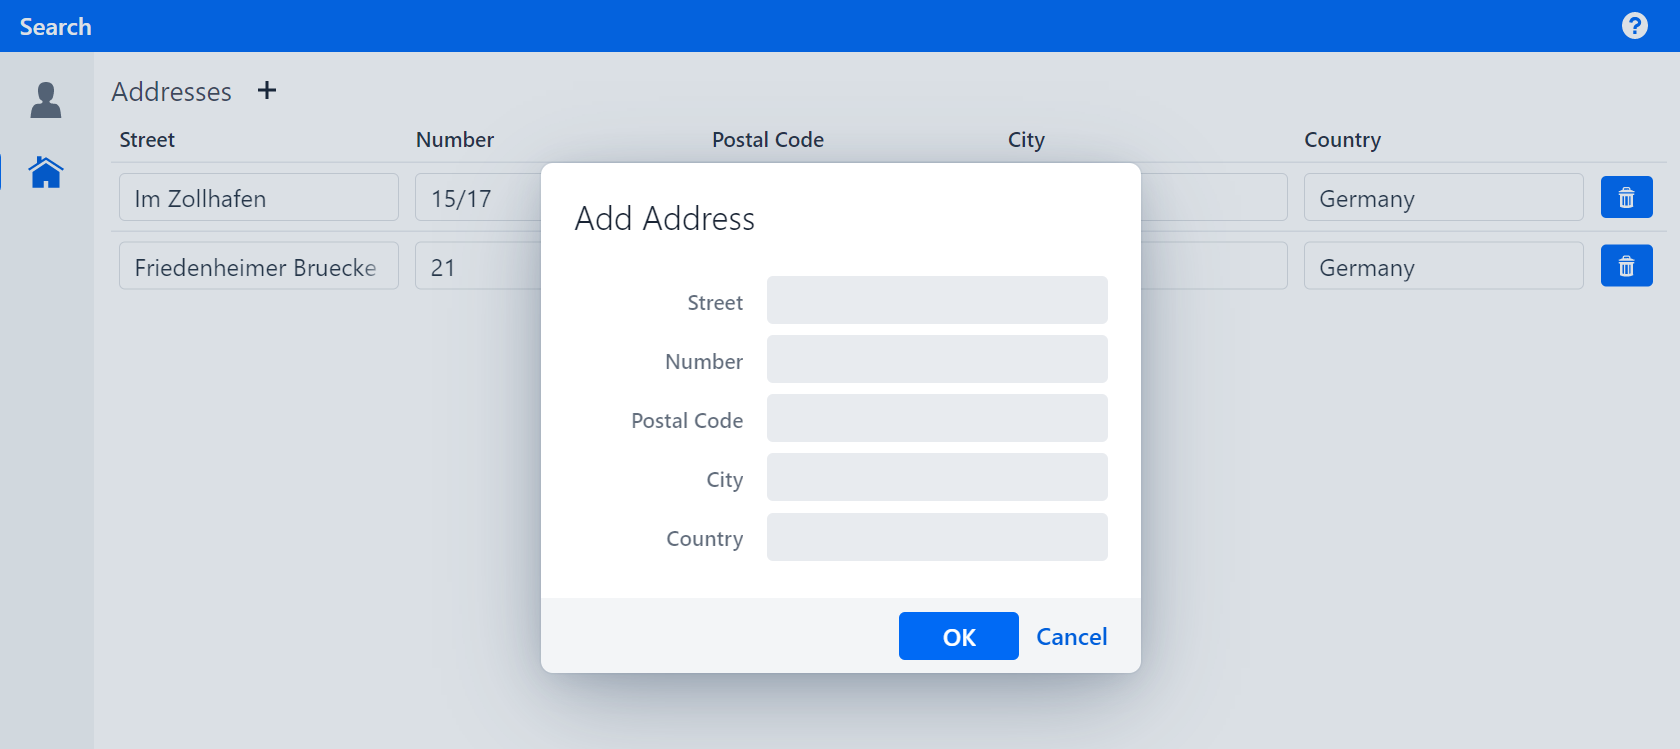
Now we will implement the actual functionality of the add button, to add new addresses. When the user clicks on the add button, they will be prompted to enter the address data in a dialog. The entry will be added when the user finishes editing by clicking on the OK button.
Figure 1. Add Address dialog
Reusing a PMO
The content of the dialog should be the same as AddressRowPmo without the delete button. To avoid writing the same PMO twice, reuse it as follows:
-
Extract a super class from
AddressRowPmosuch that it contains everything except the delete button and the consumer and call itAddressPmo. -
Annotate
AddressPmoand make sure the constructor has anAddressargument that is assigned to the fieldaddress.
The finished implementations of AddressRowPmo and AddressPmo should look like this:
AddressRowPmo.java
public class AddressRowPmo extends AddressPmo {

    private Consumer<Address> deleteConsumer;

    public AddressRowPmo(Address address, Consumer<Address> deleteConsumer) {
        super(address);
        this.deleteConsumer = deleteConsumer;
    }

    @BindReadOnlyBehavior(value = ReadOnlyBehaviorType.WRITABLE)
    @UITableColumn(width = 50)
    @UIButton(position = 60, captionType = CaptionType.NONE, showIcon = true, icon = VaadinIcon.TRASH, variants = {
            ButtonVariant.LUMO_PRIMARY, ButtonVariant.LUMO_SMALL })
    public void deleteButton() {
        deleteConsumer.accept(getAddress());
    }
}
AddressPmo.java
@UISection
public class AddressPmo {

    private final Address address;

    public AddressPmo(Address address) {
        this.address = address;
    }

    @ModelObject
    public Address getAddress() {
        return address;
    }

    @UITextField(position = 10, label = "Street", modelAttribute = "street")
    public void street() {
        // model binding
    }

    @UITextField(position = 20, label = "Number", modelAttribute = "streetNumber")
    public void streetNumber() {
        // model binding
    }

    @UITextField(position = 30, label = "Postal Code", modelAttribute = "postalCode")
    public void postalCode() {
        // model binding
    }

    @UITextField(position = 40, label = "City", modelAttribute = "city")
    public void city() {
        // model binding
    }

    @UITextField(position = 50, label = "Country", modelAttribute = "country")
    public void country() {
        // model binding
    }
}
Implementing the dialog
Now switch to the AddressPage to implement the dialog.
First, create a void method called updateUI() and implement it with getBindingContext().uiUpdated().
Then, create a new method called createNewAddress with the signature void createNewAddress() and implement it as follows:
-
Create a new
Addressinstance and assign it to a variableaddress. -
Create a new
AddressPmoinstance withaddressas the argument and store it in a variabledialogPmo. -
Assign a lambda expression, where
addressis added to thepartnerusing the methodaddAddress, to a variableaddHandlerof typeHandler. -
Assign a lambda expression, where
partneris saved in thepartnerRepository, to a variablesaveHandlerof typeHandler. -
Assign
addHandler.andThen(saveHandler).andThen(this::updateUI)to a variableokHandlerof typeHandler. -
Assign a new instance of
OkCancelDialogto a variableaddressDialogby calling the methodPmoBasedDialogFactory.newOkCancelDialog, which takes a String, a Handler and a PMO as arguments:-
The String is the title of the dialog and should be set to "Add Address".
-
The Handler should be
okHandlerand the PMOdialogPmo.
-
-
Set the width of
addressDialogto "25em" using the methodOkCancelDialog.setWidth. -
Open
addressDialogby calling the methodOkCancelDialog.open.
The finished implementation should look like this:
AddressPage.java
public void createNewAddress() {
    Address address = new Address();
    AddressPmo dialogPmo = new AddressPmo(address);

    Handler addHandler = () -> partner.addAddress(address);
    Handler saveHandler = () -> partnerRepository.saveBusinessPartner(partner);
    Handler okHandler = addHandler.andThen(saveHandler).andThen(this::updateUI);

    OkCancelDialog addressDialog =
            new PmoBasedDialogFactory()
                    .newOkCancelDialog("Add Address", okHandler, dialogPmo);
    addressDialog.setWidth("25em");
    addressDialog.open();
}

public void updateUI() {
    getBindingContext().uiUpdated();
}
Updating the functionality of the add button
Now that the dialog is implemented, you need to update the content of the method add() in AddressTablePmo such that it calls createNewAddress. Implement it as follows:
-
Add a new argument of type
Handlerto the constructor ofAddressTablePmoand assign it to a fieldcreateHandler. -
Call
createHandler.applyin the methodadd(). -
Remove the notification.
The finished implementation should look like this:
AddressTablePmo.java
private Handler createHandler;

public AddressTablePmo(Supplier<List<? extends Address>> modelObjectsSupplier, Consumer<Address> deleteAddress,
        Handler createHandler) {
    super(modelObjectsSupplier);
    this.deleteAddress = deleteAddress;
    this.createHandler = createHandler;
}

@SectionHeader
@UIButton(...)
public void add() {
    createHandler.apply();
}
Now, pass createNewAddress to the instance of AddressTablePmo in the method createContent in AddressPage.
The finished implementation should look like this:
AddressPage.java
@Override
public void createContent() {
    addSection(new AddressTablePmo(partner::getAddresses, this::deleteAddress, this::createNewAddress));
}
If you run your application and click on the add button, you should see a dialog with the same fields as the addresses table. If you click on the button "OK", you should now see a new address in the table with the information provided in the dialog.
Figure 2. Add Address dialog
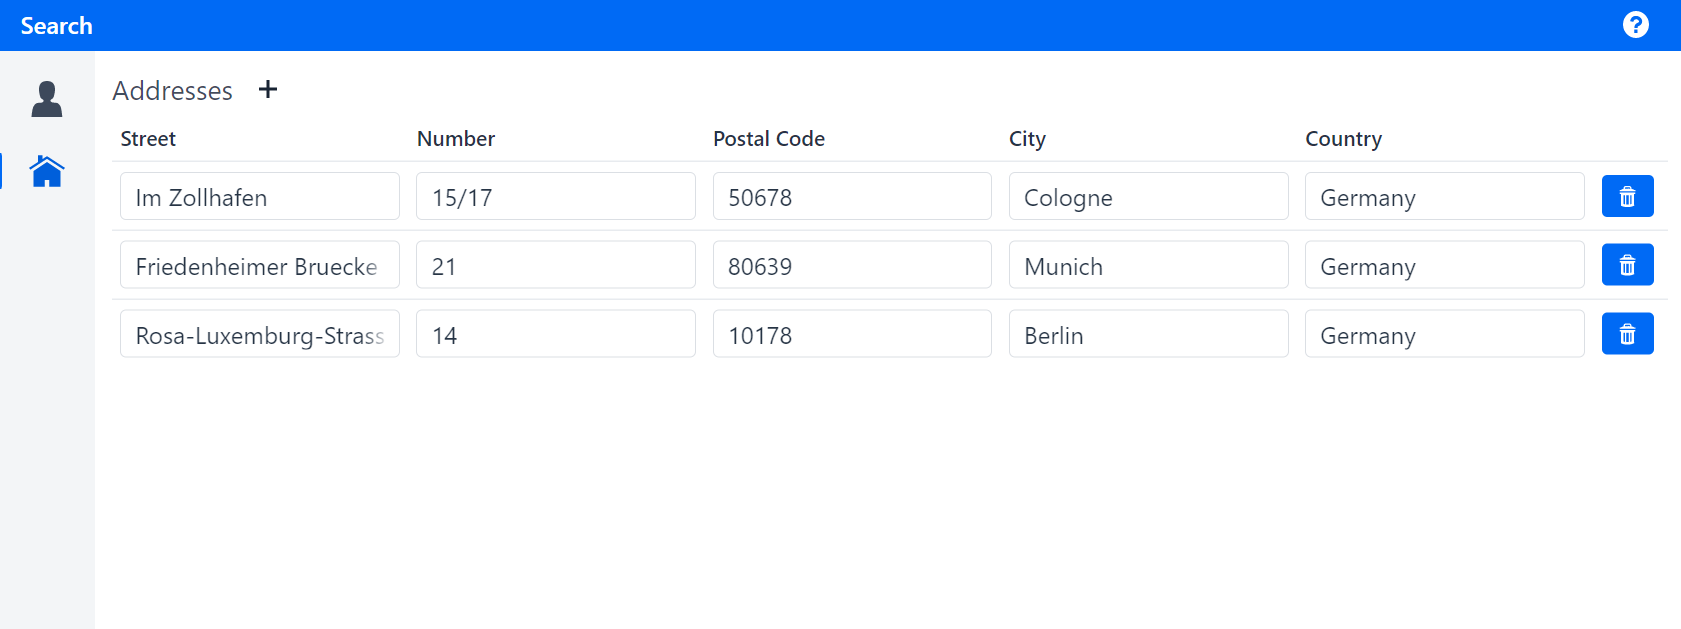
Figure 3. New Address added
The next step extends the UI such that an address cannot be added if a field is empty.