Getting Started
Example project
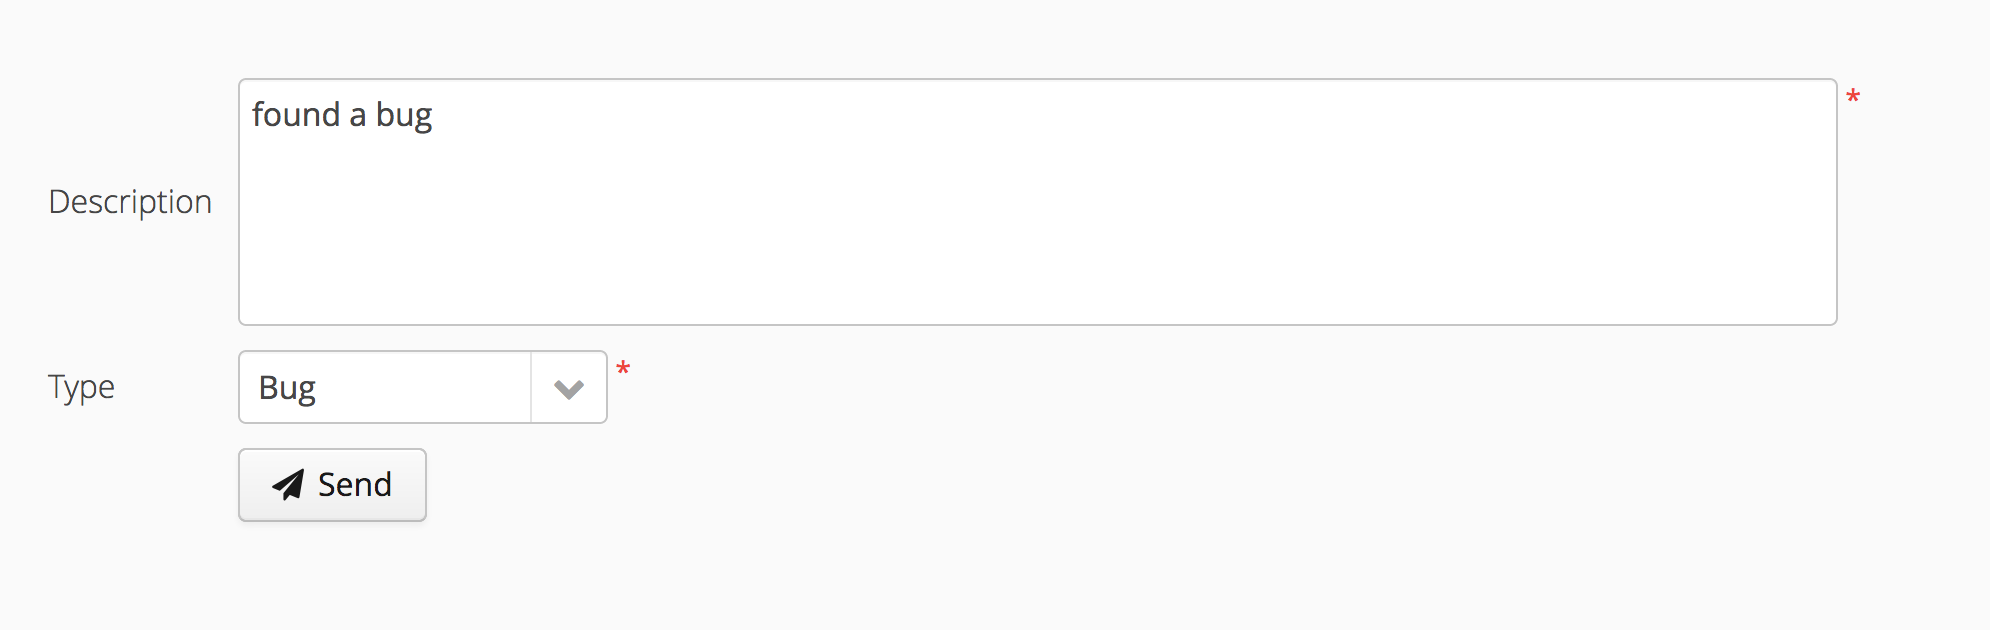
Goal
The goal is to create a simple user interface for reporting errors. The report should have a description and a type. The following types should be available:
-
Bug
-
Improvement
-
Question
The report can only be submitted if a description has been entered and a type was selected.
| Persisting the report is not part of this tutorial. |
Prerequisites
To start this project, you need
-
Java 8
-
your favorite Java IDE
-
Maven
-
a modern browser
Follow the steps described in project setup to create a new linkki Vaadin 8 project.
Step 1: Domain Model
First, we create a model to describe the domain. The model consists of two classes, Report and ReportType. These classes do not receive any UI specific annotations.
Report
public class Report {

    private Integer id;

    private String description;
    private ReportType type;

    // getters and setters
}
ReportType
public enum ReportType {

    BUG,
    IMPROVEMENT,
    QUESTION;

    public String getName() {
        String name = name();
        return name.substring(0, 1) + name.substring(1).toLowerCase();
    }
}
ReportType implements the method getName(). This method is called by linkki to display the 'caption' for the enum values.
|
Step 2: PresentationModelObject (PMO)
Our UI should show a text area to enter a description. For the selection of the report type, a combo box with the enum constants of the ReportType should be displayed. To submit the report, we also require a Send button. This button should only be active if a description has been entered and a type was selected.
Starting off, we first create a new class in the package org.linkki.samples.gettingstarted.pmo, naming it ReportSectionPmo. This class should be annotated with @UISection.
In addition, the class needs an instance variable to store the Report, which must be passed to the constructor.
ReportSectionPmo
@UISection
public class ReportSectionPmo implements PresentationModelObject {

    private final Report report;

    public ReportSectionPmo(Report report) {
        this.report = requireNonNull(report, "report must not be null");
    }


    ...
For the model binding to work, a getter method for the report must be created and it must be annotated with @ModelObject.
@ModelObject
    @ModelObject
    public Report getReport() {
        return report;
    }
Now we define the text area and the combo box. Each of these UI elements needs a method, annotated with @UITextArea and @UIComboBox respectively. The UI anontations must define the properties position and label, as well as modelAttribute which indicates which model property this field represents. These methods do not take any arguments nor need to return anything as the value will be taken from the domain model directly.
TextField and ComboBox
    @UITextArea(position = 10, label = "Description", modelAttribute = "description", required = RequiredType.REQUIRED, rows = 5, width = "50em")
    public void description() {
        // Use description from report (model object) directly
    }

    @UIComboBox(position = 20, label = "Type", modelAttribute = "type", required = RequiredType.REQUIRED)
    public void type() {
        // - bind value to the property "type" from report
        // - use enum constants from ReportType as available values
}| The annotations must always be added to the methods, not the fields of the class. |
The last step is the definition of the button. This requires a method with no arguments and return value that is annotated with @UIButton. The content of the method will be invoke upon clicking the button.
As a special feature, the button should be activated or not depending on the values in the model. This is determined via the property enabled = EnabledType.DYNAMIC in the UI annotation.
By setting EnabledType.DYNAMIC, linkki searches for a method boolean isSendEnabled(). It is called automatically during the update of the UI. Its return value determines the activation state of the button.
| The method name must conform to the convention is[NameOfThePropertyBelongingToTheAnnotatedMethod]Enabled(). The method must be public and return a boolean value. |
Button
    @UIButton(position = 30, caption = "Send", icon = VaadinIcons.PAPERPLANE, showIcon = true, enabled = EnabledType.DYNAMIC)
    public void send() {
        report.save();
        Notification.show(
                          String.format("Report with id %d filed!", report.getId()),
                          "Thank you for reporting!",
                          Notification.Type.TRAY_NOTIFICATION);
    }

    /**
     * Enable button only if description and type is present.
     *
     * @return {@code true} if button is enabled otherwise {@code false}
     */
    public boolean isSendEnabled() {
        String description = report.getDescription();
        return description != null && !description.isEmpty()
                && report.getType() != null;
    }
Step 3: Vaadin UI
The UI contains "only" the section for the creation of the report.
The first part is "normal" Vaadin code. The interesting linkki parts start at (2). The PMO is passed as parameter to the method PmoBasedSectionFactory#createAndBindSection, as well as a BindingContext. At last, the created section must now be set as content of the UI.
UI
@Theme(value = "valo") (1)
public class GettingStartedUI extends UI {

    private static final long serialVersionUID = 1L;

    @Override
    protected void init(VaadinRequest request) {

        Page.getCurrent().setTitle("linkki :: Getting Started");
        (2)
        AbstractSection section = PmoBasedSectionFactory.createAndBindSection(new ReportSectionPmo(new Report()),
                                                                              new BindingContext("report-context"));

        setContent(section);
    }
}| 1 | Standard Vaadin code |
| 2 | linkki specific code |
Step 4: web.xml
The application must be made known to the application server. It expects a web.xml, in which our UI is started with the VaadinServlet.
<?xml version="1.0" encoding="UTF-8"?>
<web-app xmlns:xsi="http://www.w3.org/2001/XMLSchema-instance" xmlns="http://java.sun.com/xml/ns/javaee"
         xsi:schemaLocation="http://java.sun.com/xml/ns/javaee http://java.sun.com/xml/ns/javaee/web-app_3_0.xsd" version="3.0">

    <display-name>Linkki-Getting-Started</display-name>

    <distributable/>

    <servlet>
        <servlet-name>Vaadin Application Servlet</servlet-name>
        <servlet-class>com.vaadin.server.VaadinServlet</servlet-class>
        <init-param>
            <param-name>UI</param-name>
            <param-value>org.linkki.samples.gettingstarted.GettingStartedUI</param-value>
        </init-param>
    </servlet>

    <servlet-mapping>
        <servlet-name>Vaadin Application Servlet</servlet-name>
        <url-pattern>/*</url-pattern>
    </servlet-mapping>

</web-app>
Starting the Application
The application can be started from the command line via
$> mvn clean install tomee:runand is then reachable at http://localhost:8080/linkki-getting-started.
Step 5 (optional): Using the linkki Widgetset
linkki comes with a custom Vaadin widgetset. Follow the instructions in the chapter linkki Widgetset to use it and extend your Report with a LocalDate field and the ReportSectionPmo with a @UIDateField.